Visual studio code を用いたgit操作
この記事の目的
Visual studio codeを用いてgit操作をする方法についてまとめる。
1. Visual studio codeを用いたgit操作
git操作の手段としてはコマンド以外にvisual studio code、source treeなどのツールを利用する方法がある。 Windows/Linuxに依存せず利用可能でソースコード編集の機能も充実しているVSCodeでgit操作する方法についてまとめる。
2. 拡張機能
VS Codeは標準でgit連携機能をサポートしているが下記拡張機能をインストールしておくとソースコードの管理・確認の利便性を向上できる。
Git History ソースコードの履歴をブラウジングしやすくするための拡張機能 marketplace.visualstudio.com
Git Lens ファイルやコミット毎の変更差分を可視化する拡張機能 marketplace.visualstudio.com
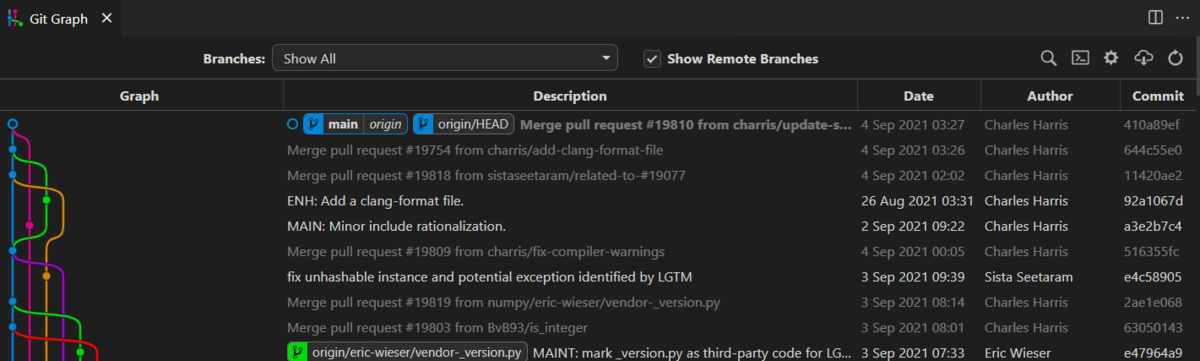
Git Graph ブランチの関係(どのブランチからマージされているかなど)を可視化する拡張機能 marketplace.visualstudio.com
## 3. VSCodeとgithubの連携/ソースコードの取得
すでにgithubにあるリポジトリをクローンする場合、VS codeのソースコード管理画面からリポジトリの複製画面を選択する。
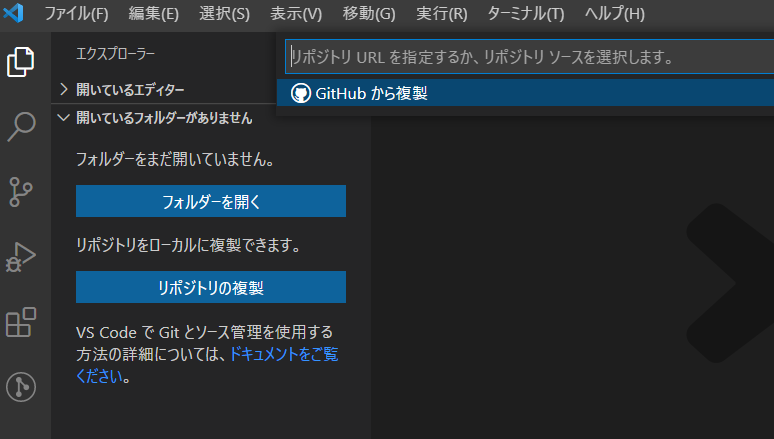
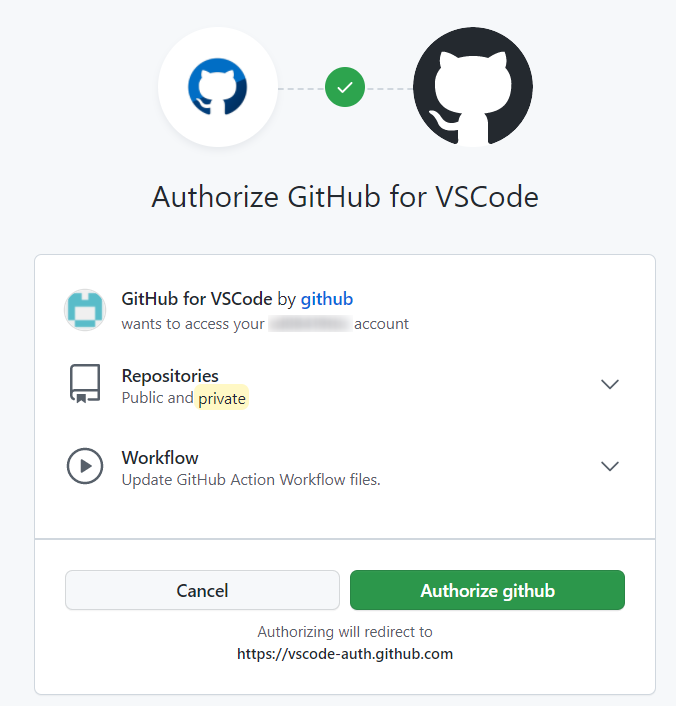
初回のみ、どのgithubアカウントと連携するかの情報を入力する必要がある。ブラウザが立ち上がるのでgithubのアカウント情報を入力してVSCodeとの連携を許可する。
連携が完了すると自分のアカウントにあるリポジトリの一覧が表示される。

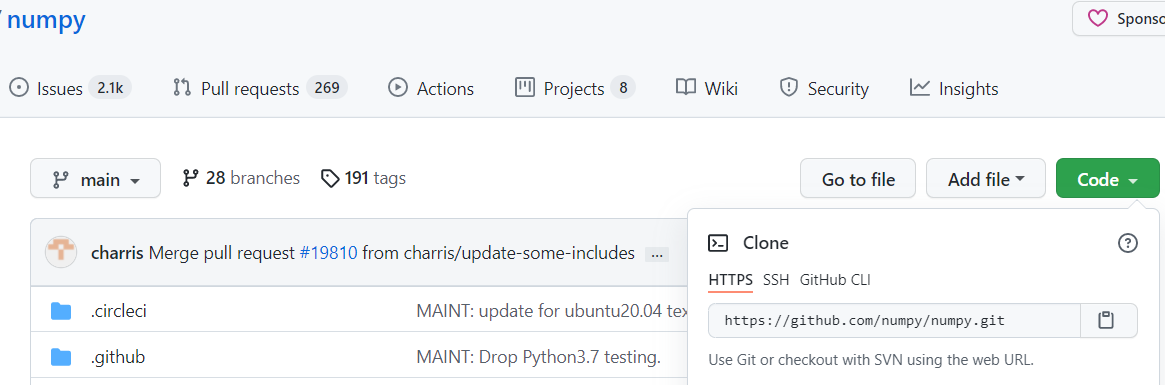
ここで、他アカウントで作成してあるソースコードをcloneしたい場合には、コマンドパレットにキーワードを入れてgithubのリポジトリを検索するか 参照するリポジトリのURLを入力する。ブラウザで検索したソースコードをcloneするURLは各ページのCodeボタンを押して取得できる。
4.変更履歴の確認
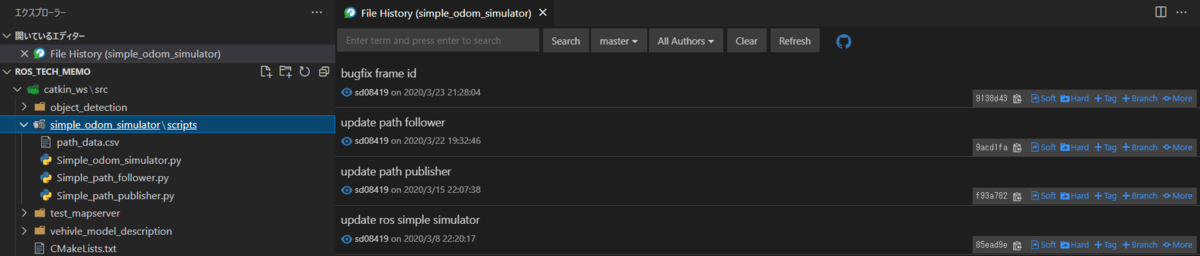
取得したソースコードが過去にどのように変更されたかは過去のコミット履歴から確認できる。

また特定のファイルについて過去のコミットでどのように変更されたかを確認したい場合にはFileHistoryで確認することができる。
5.ブランチの作成・移動
ブランチの移動は移動対象ブランチを選択し、『Switch to Branch』を選択して行う。

新規ブランチ作成はCreate Branchを選択して行う。
また、各ブランチの関係(マージされたタイミングなど)はgit graphで可視化することができる。 git graphはコマンドパレットから『Git Graph : View Git Graph』を選択することで表示できる。
6.変更の反映 (コミット/プッシュ)
ローカルでの変更内容をコミットは、①ファイルのステージ、②コミット、③プッシュの順に行う。
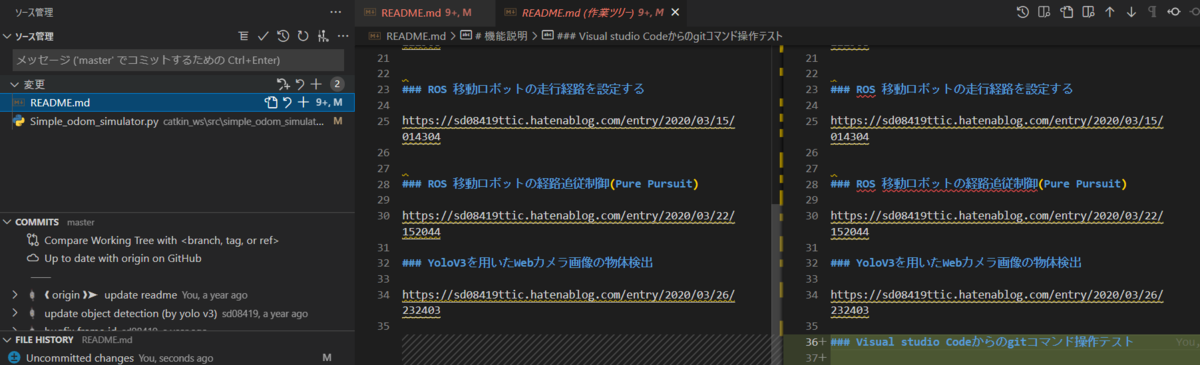
①ファイルのステージ
ローカルにあるファイルを変更して保存し、過去のコミットと差分が発生するとソース管理画面の"変更"画面に差分が発生しているファイルが表示される。 内容を確認し、"変更をステージ"ボタンを押してファイルをステージングする。
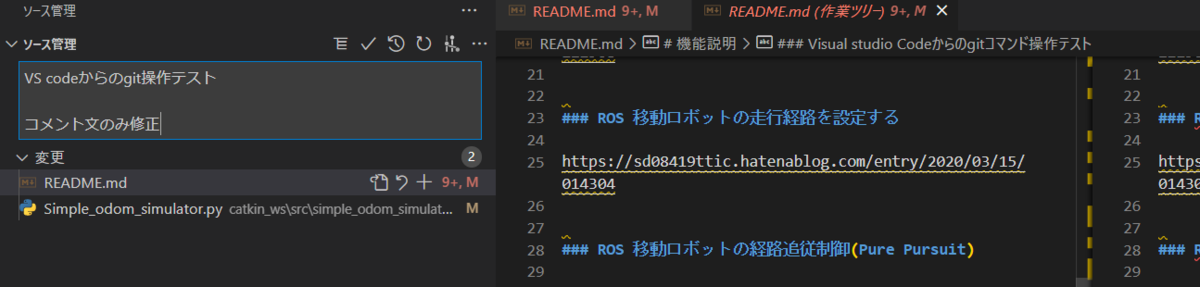
②コミットメッセージの入力
コミットの変更内容に対する説明用メッセージをメッセージ入力画面に入力し、ローカルリポジトリに変更内容をコミットする。
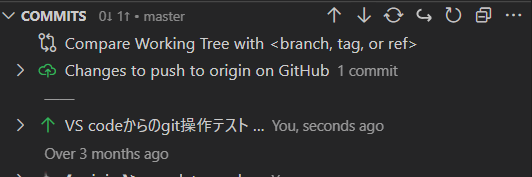
③変更内容のプッシュ
ソースコード管理画面のCOMMITの横にあるプッシュボタン(↑)を押して、変更内容をリモートリポジトリにプッシュする。
7.リモートリポジトリの変更内容取得(プル)、コンフリクトの修正
自分が編集中のリモートリポジトリに対して修正された内容を取得する場合にはソースコード管理画面のCOMMITの横にある↓ボタンでプルを行う。
この際、自分のコミットとリモートリポジトリの変更内容でコンフリクト(競合)が発生する場合がある。その場合は競合した箇所に対してどちらの内容を反映するかを選択してマージする。

ROS2 navigation stack odometryの出力
この記事の目的
ROS2のnavigation stack用にpython scriptからodometryを出力する方法をまとめる。 ROS2とnavigagiton2 は下記記事に従って導入済みであることを前提とする。 sd08419ttic.hatenablog.com
1. スクリプトの構成
ROS2のpythonスクリプトの記述の実装方法は下記のチュートリアルに記載されている。
ROSと異なり、rclpyのNodeを継承して処理を記述し、一定周期に呼び出す処理をcallback関数で記述するように変更されている。 簡潔に記述するため、ROS2のノード処理(ノード立ち上げ、周期処理、終了)およびトピック通信(publish/subscribe)と制御に関する処理(自己位置の計算など)を別ファイルに記載する。
1. publish/subscribe処理の実装
ROS2でodometryを10msecでpublishし続けるスクリプトは下記のように記述できる。 下記スクリプトはOdomSimulatorNode生成時のinit関数でodometryのpublisher初期化、cmd_velのsubscribe設定、周期処理呼び出しのtimer設定をしている。 その後、ノード実行中はcmd_velのsubscribe成功時にsub_cmdvel_callbackで受信内容の保存、20msec周期でtimer_callbackから位置情報の更新とpublish、TFのbroadcastを行う。位置情報・TFの計算はodom_simulator_func.pyに記述する。
#!/usr/bin/env python
# -*- coding: utf-8 -*-

import pandas as pd
# import for ros function
import rclpy
from rclpy.node import Node
import tf2_py
from geometry_msgs.msg import PoseStamped, Twist
from std_msgs.msg import Header
from nav_msgs.msg import Path, Odometry
from odom_simulator_func import OdomSimlatorFunc
from tf2_ros.transform_broadcaster import TransformBroadcaster

class OdomSimulatorNode(Node):

    ##################
    # Initialization #
    ##################
    def __init__(self):
        super().__init__('Odom_Simulator')

        #initialize publisher
        self.OdometryPub_ = self.create_publisher(Odometry, '/odom', 10)
        self._tf_Odompublisher = TransformBroadcaster(self)

        #initialize subscriber
        self.CmdvelSub = self.create_subscription(
            Twist,
            '/cmd_vel',
            self.sub_cmdvel_callback,
            10)

        self.CmdvelSub  # prevent unused variable warning

        #timer configuration
        timer_period = 0.02  # seconds
        self.timer = self.create_timer(timer_period, self.timer_callback)
        #self.path_follow_func = Path_follow_func()
        self.cnt = 0

        self.odomSimFunc = OdomSimlatorFunc()

    def timer_callback(self):
        # publish odom data
        #cmdvel = self.pathfollowerFunc.update_cmd_vel()
        #odom = Odometry()
        odom, tf_odom = self.odomSimFunc.update_odom()
        #calc cmdvel
        odom.header.stamp = self.get_clock().now().to_msg()
        self.OdometryPub_.publish(odom)
        tf_odom.header.stamp = self.get_clock().now().to_msg()
        self._tf_Odompublisher.sendTransform(tf_odom)
        self.cnt += 1
        if self.cnt %10 ==0:
            self.get_logger().info('Publishing Count: "%s"' % self.cnt)

    #subscriber call back for Odometry
    def sub_cmdvel_callback(self, msg):
        self.odomSimFunc.set_cmdvel_from_subscriber(msg)
        test = Twist()
        self.get_logger().info('I heard: "%s"' % msg.linear)

def main(args=None):
    rclpy.init(args=args)

    odomSimNode = OdomSimulatorNode()
    rclpy.spin(odomSimNode)

    # Destroy the node explicitly
    # (optional - otherwise it will be done automatically
    # when the garbage collector destroys the node object)
    odomSimNode.destroy_node()
    rclpy.shutdown()


if __name__ == '__main__':
    main()
2. 位置情報・TFの計算方法
位置情報・TFの計算処理は下記のように記述できる。cmd_velで受信した目標速度・ヨーレートから座標を更新する。 ROS2ではTFからクォータニオンとオイラー角を変換する関数がなくなってしまったのでtf_lib ファイルに変換処理を記述する。
#!/usr/bin/env python
# -*- coding: utf-8 -*-

import math
# import for ros function
from geometry_msgs.msg import Point, Pose, Quaternion, Twist, Vector3
from std_msgs.msg import Header
from nav_msgs.msg import Odometry
from geometry_msgs.msg import TransformStamped
from tf_lib import euler_from_quaternion, quaternion_from_euler


class OdomSimlatorFunc():

    ##################
    # Initialization #
    ##################
    def __init__(self):

        #Save path_plan flag
        self.save_path_as_csv = True

        #Cmd_vel receive flag (auto control)
        self.subscribe_cmd_vel = False

        #Parameter
        self.MAX_SPEED_KMH = 30.0                       # MAX vehicle speed [km/h]
        self.MIN_SPEED_KMH = -20.0                      # MINIMUM vehicle speed [km/h]
        self.MAX_SPEED_MPS = self.MAX_SPEED_KMH / 3.6   # MAX vehicle speed [km/h]
        self.MIN_SPEED_MPS = self.MIN_SPEED_KMH / 3.6   # MAX vehicle speed [km/h]
        self.MAX_YAW_RATE = 1.57                        # MAX YAWRATE [rad/s]

        #initiali position
        initPosx = 0.0
        initPosy = 0.0

        #Initialize odometry header
        self.odom_header = Header()
        self.odom_header.frame_id = "map"

        # Initialize pose info
        self.sim_pose = Pose()
        self.sim_pose.position.x = initPosx
        self.sim_pose.position.y = initPosy
        self.sim_pose.position.z = 0.0
        self.sim_pose.orientation.x = 0.0
        self.sim_pose.orientation.y = 0.0
        self.sim_pose.orientation.z = 0.0

        # initialize twist info
        self.sim_twist = Twist()

        # Initialize odometry info
        self.sim_odom = Odometry()
        self.sim_odom.header = self.odom_header
        self.sim_odom.child_frame_id = "base_link"
        self.sim_odom.pose.pose = self.sim_pose
        self.sim_odom.twist.twist = self.sim_twist

        self.cmdvel_linear_x = 0.0
        self.cmdvel_linear_y = 0.0
        self.cmdvel_angular_z = 0.0

    #############################################
    # Update odometry form User request cmd_vel #
    #############################################
    def update_odom(self):
        #Update Vehicle Pose

        sampletime = 0.01    #calculate by 10msec
        e = euler_from_quaternion(self.sim_pose.orientation.x, self.sim_pose.orientation.y, self.sim_pose.orientation.z, self.sim_pose.orientation.w)
        yaw_euler = e[2]

        #update pose from user request
        self.sim_pose.position.x = self.sim_pose.position.x + self.cmdvel_linear_x*sampletime*math.cos(yaw_euler)
        self.sim_pose.position.y = self.sim_pose.position.y + self.cmdvel_linear_x*sampletime*math.sin(yaw_euler)
        updated_yaw = e[2] + self.cmdvel_angular_z*sampletime

        updated_quaternion = quaternion_from_euler(0, 0, updated_yaw)
        self.sim_pose.orientation.x = updated_quaternion[0]
        self.sim_pose.orientation.y = updated_quaternion[1]
        self.sim_pose.orientation.z = updated_quaternion[2]
        self.sim_pose.orientation.w = updated_quaternion[3]

        #update timestamp
        #self.odom_header.stamp = rospy.Time.now()
        self.sim_odom.header = self.odom_header
        self.sim_odom.pose.pose = self.sim_pose
        self.sim_odom.twist.twist = self.sim_twist

        #update TF
        map_frame = TransformStamped()
        map_frame.header.frame_id = 'map'
        map_frame.child_frame_id = 'odom'
        map_frame.transform.translation.x = self.sim_pose.position.x
        map_frame.transform.translation.y = self.sim_pose.position.y
        map_frame.transform.translation.z = 0.0
        map_frame.transform.rotation.w = self.sim_pose.orientation.w
        map_frame.transform.rotation.x = self.sim_pose.orientation.x
        map_frame.transform.rotation.y = self.sim_pose.orientation.y
        map_frame.transform.rotation.z = self.sim_pose.orientation.z

        return self.sim_odom, map_frame

    #####################
    # cmdvel subscriber #
    #####################
    def set_cmdvel_from_subscriber(self, msg):
        self.cmdvel_linear_x =msg.linear.x
        self.cmdvel_angular_z =msg.angular.z
tf_lib.py (座標変換処理)
#!/usr/bin/env python
# -*- coding: utf-8 -*-

import numpy as np
import math

def euler_from_quaternion(x,y,z,w):
    """
    Converts quaternion (w in last place) to euler roll, pitch, yaw
    quaternion = [x, y, z, w]
    Bellow should be replaced when porting for ROS 2 Python tf_conversions is done.
    """

    sinr_cosp = 2 * (w * x + y * z)
    cosr_cosp = 1 - 2 * (x * x + y * y)
    roll = np.arctan2(sinr_cosp, cosr_cosp)

    sinp = 2 * (w * y - z * x)
    pitch = np.arcsin(sinp)

    siny_cosp = 2 * (w * z + x * y)
    cosy_cosp = 1 - 2 * (y * y + z * z)
    yaw = np.arctan2(siny_cosp, cosy_cosp)

    return roll, pitch, yaw


def quaternion_from_euler(roll, pitch, yaw):
    """
    Converts euler roll, pitch, yaw to quaternion (w in last place)
    quat = [x, y, z, w]
    Bellow should be replaced when porting for ROS 2 Python tf_conversions is done.
    """
    cy = math.cos(yaw * 0.5)
    sy = math.sin(yaw * 0.5)
    cp = math.cos(pitch * 0.5)
    sp = math.sin(pitch * 0.5)
    cr = math.cos(roll * 0.5)
    sr = math.sin(roll * 0.5)

    q = [0] * 4
    q[0] = cy * cp * cr + sy * sp * sr
    q[1] = cy * cp * sr - sy * sp * cr
    q[2] = sy * cp * sr + cy * sp * cr
    q[3] = sy * cp * cr - cy * sp * sr

    return q
上記処理を実行し、cmd_velを出力するとodomの出力・TFの発行がされていることをrviz2などで確認できる。 cmd_velは下記コマンド等で発行可能
ros2 topic pub /cmd_vel geometry_msgs/Twist '{linear: {x: 0.1}, angular: {z: 0.3}}'
ソースコードは下記にまとめている。
ROS2導入・初期設定
この記事の目的
ROS2の導入と初期設定・注意点等についてまとめる
1. ROS2の導入
Ubuntu20.04を利用している場合、下記サイトに従ってROS2 forxyを導入する。
上記手順では、localeをen_US.UTF-8 に切り替えているがこのコマンドを入力せず日本語のままでもインストールできる。
setup.bashの読み込みはROS1と同様に.bashrcに下記記載を加えておくと毎回入力しなくてもよい。
source /opt/ros/foxy/setup.bash
ビルドシステムcolconは下記コマンドでインストールする。(ROS2のインストールとは別に実行する必要があるので注意)
sudo apt install python3-colcon-common-extensions
2. チュートリアルの実施
ROS2の基本的な使い方(パッケージ作成、ビルド、subscribe/publishなど)は下記ページのチュートリアルに記載されている。
ROS2ではROSに対して下記のような変更点がある。
- ビルドシステムの変更(colcon)
ROS2ではパッケージのビルドシステムがcatkinからcolconに変更となっている。 catkinではプロジェクト内の全パッケージがdevelにソフトリンクされていたが、colconでは明示的にインストールするパッケージを記述する必要があるなどの違いがある。また、作成するパッケージがpythonかCかで記述する設定が異なるので注意する。
- roscoreの廃止
ROSではroscoreコマンドでmasterノードを立ち上げ、各ノード間通信を司っていたがROS2では廃止された。 ROS2ではmasterノードを介さず、各ノード同士が通信する仕組みに変更されている。
- Life Cycle Managerの導入
各ノードの状態(初期化前、無効、有効、終了後)などを管理するための仕組みとしてLife Cycle Managerという仕組みが導入された。
後述するnavigation stackではこの仕組に従って状態を操作しなければ適切に動作しない機能があるのに注意する。
- launchファイルの記述方法変更
ROSではxmlファイルで記述していたlaunchファイルがpythonスクリプトで記述するように変更された。 記述方法は下記のチュートリアルに記載されている。
3. navigation stackの導入
移動ロボット用の ROS2 packageとしてnavigation 2を導入する。
導入方法・動作確認は下記サイトの手順に従って行う。 (virtual box のubuntuでの動作などではgazeboo起動までに非常に時間がかかるので注意する)
git設定・コマンドまとめ
この記事の目的
gitの設定・コマンドについてまとめる。(個人用メモ。逐次追記予定)
1. gitのインストールと初期設定
ubuntuでは下記コマンドでインストールする。
sudo apt install git
インストール後にuser名・メールアドレスを設定する。 (ユーザー名・メールアドレス未設定だとエラーが発生するので注意)
git config --global user.email "UserName"
git config --global user.email "EMail@example.com"
Proxyの設定 (社内ネットワーク等の場合のみ)
git config --global http.proxy http://[proxy]:[port]
git config --global https.proxy http://[proxy]:[port]
github連携設定 (パスワード入力を省力化できる)
git ignoreの指定
gitinitしたフォルダのうち、管理対象としたくないものを指定する。(拡張子・フォルダ名等の指定が可能) なお、gitでは空フォルダの管理ができないので、空フォルダを管理したい場合はダミーファイルを作成する必要がある。
2. gitコマンド
2.1 リポジトリの作成・クローン
ローカルで作成したフォルダからgitリポジトリを作成する場合 レポジトリを作成したいフォルダを作成、移動してgit initコマンドを実行することでgit repositoryが作成される。(.gitフォルダが生成される)
mkdir testFolder
cd testFolder
git init
git init コマンドは下記オプションを利用できる。
| option | 説明 |
|---|---|
| bare | リポジトリをBareリポジトリとして作成する |
| shared | 同じグループに所属するユーザーからのpushを許容する |
BareリポジトリはWorking Folderを持たないので容量削減が可能 (開発者が操作しないファイルサーバー等に適した設定) 既に存在するレポジトリからローカルレポジトリを作成する場合git clone コマンドを利用する。
#github のレポジトリのclone (URLはブラウザで各レポジトリにアクセスし、"Code"ボタンから確認可)
git clone git@github.com:sd08419ttic/ros_tech_memo.git

#ローカルネットワーク上の他PCのレポジトリのclone
git clone "userName"@"192.168.XXX.XXX":"~/gitFolder"
git clone コマンドは下記オプションを利用できる。
| option | 説明 |
|---|---|
| bare | リポジトリをBareリポジトリとして作成する |
| shared | 同じグループに所属するユーザーからのpushを許容する |
| branch | cloneするブランチ名を指定する |
| depth | 取得する履歴の個数を指定する |
更新回数が多い巨大プロジェクトの場合、-- depth 1 オプションを指定することでファイルサイズの消費量を少なくすることができる。
2.2 ブランチの操作
下記でブランチの確認・追加・削除・移動を行う
#ブランチの確認
git branch

#ブランチの新規作成
git branch new branchName

#ブランチの削除
git branch -d branchName

#別ブランチへの移動
git checkout branchName
2.3 コミット操作
下記でローカルのレポジトリに加えた変更内容のコミットを行う。
# git add する前の変更点確認
git diff

#変更内容のadd #-aオプションですべてのファイル、 ファイル名の指定個別指定も可能
git add -a
git add test.txt

#addの取り消し
git reset HEAD

#git addしたファイルの変更点確認
git diff --cached

#コミット・メッセージの登録
git commit -m "initial commit"

#直前のコミットの削除
git reset --hard HEAD^
2.4 プル操作
下記でリモートブランチでの変更内容をローカルリポジトリにマージする。
#ローカルブランチ名origin、リモートブランチ名masterrの場合
git pull origin master
2.4 プッシュ操作
下記でコミットした内容をリモートブランチにpushする。
#コミットされている内容の確認(diff) (ブランチmasterを変更している場合)
git fetch origin
git diff HEAD..origin/master

#コミット内容のpush
git push origin master
参考資料
リンク
リンク
Visual Studio Codeの便利な設定・拡張機能
この記事の目的
Visual Studio Codeの便利な設定・拡張機能についてまとめる
1. 共通設定
- Visual Studio Codeの日本語化
下記拡張機能をインストール (インストール後VScodeの再起動が必要)
- スペースの可視化
ファイル⇒基本設定⇒設定画面に移動し、"Editor: Render Whitespace"の設定をALLに変更する。

- エディタの縮小・拡大 (Ctrl + マウスホイールのズーム)
ファイル⇒基本設定⇒設定画面に移動し、"Ctrl キーを押しながらマウス ホイールを使用してエディターのフォントをズームします。"を有効化 リセットはコマンドパレットの『エディターのフォントのズームをリセット』を選択する。

- 対応する括弧の強調表示
コード上の対応する括弧を可視化するための拡張機能
- インデントレベルの強調表示
同じインデントレベルごとに色分けして表示するための拡張機能
- アイコンの変更
ファイル拡張子がわかりやすいアイコンに変更する拡張機能。インストール後にファイル⇒基本設定⇒設定画面に移動し、Workbench: Icon Themeからvscode-iconsを選択する。
- フォルダ・ファイルパスの補完
フォルダ・ファイルパスを自動補間するための拡張機能。下記をインストール後、エディタで"/"と入力してCtrl + Spaceでフォルダ階層を補間することができる。
1. ソフト開発用の設定/拡張機能
プログラム言語ごとに役立つ拡張機能をまとめる
C言語用設定・拡張機能
C言語開発の拡張機能(InteliSense/デバッグ機能など)
プロジェクト設定方法は下記などを参考にする。Windows+個人開発であればVS CodeでなくVisual Studio 2019を使った方が面倒な設定をせずにより充実した機能を利用できる。
- Doxgen用拡張機能
C言語でDoxgenのフォーマットに従ったコメントをプレビュー表示することができる拡張機能。Doxgenフォーマットに従ったコメントを記述したC/Hファイルを開いて"Doxgen Previewer"を表示。
Python用設定・拡張機能
Python開発の拡張機能(InteliSense/デバッグ機能など)
- Anaconda
AnacondaをVS Codeで読み込むための機能。コマンドパレットでPython Interpreter からAnaconda仮想環境の切り替えが可能になる。
2.ドキュメント作成用の設定/拡張機能
- Markdownのプレビュー
VS Code標準機能を使う場合、下記サイトに従いコマンドパレット⇒『Markdownプレビューを横に表示』でプレビューを確認しながらMarkdownを編集できる。
上記ではなく拡張機能『Markdown Enhanced』をインストールすると『KaTex』を用いた数式の追加も行うことができ利便性が上がる。 表示するにはインストール後にコマンドパレット⇒『Markdown Preview Enhanced: Open Preview to the Side』を選択する。
設定後のイメージ (プレビュー画面でKaTexの数式プレビューが表示可能)

Katexに関する記述は下記サイトが参考になる。
https://b1tblog.com/2019/10/08/vscode-math/
- Markdownのhtml/pdf出力
記述したmarkdownをインストールするためには下記の拡張機能を利用できる。 インストール後にコマンドパレット⇒『Markdown PDF Export:XXX』を選択する。(PDF/HTML/JPEGなどで出力できる。KaTEXも反映される)
- Markdown画像貼り付け
markdownにコピーアンドペーストした画像を張り付ける際には下記拡張機能が便利である。 画像をCtrl+Cでコピーした状態でCtrl+Alt+Vで画像を指定したフォルダにコピーし、Markdownファイルのリンク生成ができる。
画像を保存するフォルダは下記設定から指定できる。下記設定をしておくと、markdownファイルと同じ階層にあるimageフォルダに画像が追加されていく設定になる。

- Review環境
VS CodeでReviewファイルを編集するための拡張機能として下記を利用できる。
Review自体のインストールが必要となるので下記サイトを参考に導入するとよい。
- 日本語校正
MarkdownおよびReviewの日本語校正拡張機能として下記を利用できる。冗長な言い回しの添削などに活用できる。
3.設定・拡張機能の別PCへの移行方法
githubを利用できる環境では下記手順で移動できる (未確認)
利用するのに問題がある場合、下記のように設定ファイルをコピーすることができる。 (バージョンによって異なる可能性があるので要バックアップ)
画像認識② YoloV3を用いたWebカメラ画像の物体検出
この記事の目的
YoloV3を用いてWebカメラ画像から物体検出をしROS Topicで判定結果を出力する方法をまとめる
1. 移動ロボット用の物体検出アルゴリズム
移動ロボットの自律走行では、自車周辺の障害物を認識し車両制御(減速や停止、走行経路の計算など)で利用する必要がある。 その際、カメラ画像に障害物(人や車など)が含まれるかを認識する方法がよく用いられる。物体認識のアルゴリズムは日進月歩で進化しているが、本記事では高精度で計算速度に秀でたYoloV3を用いてWebカメラから物体を検出し、結果をROSトピックとして出力する方法について説明する。(物体認識アルゴリズムの歴史については下記記事が詳しい。)
物体認識の性能としては更に新しいM2Detという手法の方が高性能であるようだが、Pytorch (Python3.Xが必要)なのでROS対応が煩雑であるため今回は見送る。
なお、YoloV3にはROS用のパッケージも提供されているが、今回はWebカメラで読み込んだ画像をOpenCVで取り込んでYoloV3にかけるPythonスクリプトとして下記は利用せずに実装する。 (Webカメラ画像に前処理をかけたり、結果を加工する際に便利なため)
2. YoloV3のインストール/Python2+OpenCV用のインターフェース設定
YoloV3のインストールは公式サイトの手順で実行できる。
ソースのダウンロードと合わせて学習済みモデルを下記コマンドでダウンロードしておく。
#yolov3
wget https://pjreddie.com/media/files/yolov3.weights

#tiny-yolov3
wget https://pjreddie.com/media/files/yolov3-tiny.weights
MAKE時にGPUを有効(NVidia製 GPUを搭載したPCのみ)およびOpenCVの読み込みを行いたいのでMakefileの下記オプションを有効にする。
GPU=1
CUDNN=1
OPENCV=1
また、darknetのデフォルトでは画像形式はopencvの画像形式(numpyのndarray)を渡して検出結果を取得する手段が提供されていない。 ndarrayを渡して検出結果がpythonで取得できるように関数の一部を修正する。(下記サイトのQAを参考とした)
darknet/src/image.cの最後尾に関数を追加
image ndarray_to_image(unsigned char* src, long* shape, long* strides)
{
    int h = shape[0];
    int w = shape[1];
    int c = shape[2];
    int step_h = strides[0];
    int step_w = strides[1];
    int step_c = strides[2];
    image im = make_image(w, h, c);
    int i, j, k;
    int index1, index2 = 0;

    for(i = 0; i < h; ++i){
            for(k= 0; k < c; ++k){
                for(j = 0; j < w; ++j){

                    index1 = k*w*h + i*w + j;
                    index2 = step_h*i + step_w*j + step_c*k;
                    //fprintf(stderr, "w=%d h=%d c=%d step_w=%d step_h=%d step_c=%d \n", w, h, c, step_w, step_h, step_c);
                    //fprintf(stderr, "im.data[%d]=%u data[%d]=%f \n", index1, src[index2], index2, src[index2]/255.);
                    im.data[index1] = src[index2]/255.;
                }
            }
        }

    rgbgr_image(im);

    return im;
}
darknet/src/image.hに関数宣言を追加
#ifdef OPENCV
void *open_video_stream(const char *f, int c, int w, int h, int fps);
image get_image_from_stream(void *p);
image load_image_cv(char *filename, int channels);
image ndarray_to_image(unsigned char* src, long* shape, long* strides);
int show_image_cv(image im, const char* name, int ms);
#endif
darkne.pyに追加
from ctypes import *
import math
import random
import sys #追加
import cv2 #追加

#中略

predict_image = lib.network_predict_image
predict_image.argtypes = [c_void_p, IMAGE]
predict_image.restype = POINTER(c_float)

##以下を追加 (ndarryを読み込む処理)

ndarray_image = lib.ndarray_to_image
ndarray_image.argtypes = [POINTER(c_ubyte), POINTER(c_long), POINTER(c_long)]
ndarray_image.restype = IMAGE

##ここまで

#関数 detect_npをopencv用に追加
def detect_np(net, meta, np_img, thresh=.5, hier_thresh=.5, nms=.45):
    im = nparray_to_image(np_img)
    num = c_int(0)
    pnum = pointer(num)
    predict_image(net, im)
    dets = get_network_boxes(net, im.w, im.h, thresh, hier_thresh, None, 0, pnum)
    num = pnum[0]
    if (nms): do_nms_obj(dets, num, meta.classes, nms);
    res = []
    for j in range(num):
        for i in range(meta.classes):
            if dets[j].prob[i] > 0:
                b = dets[j].bbox
                res.append((meta.names[i], dets[j].prob[i], (b.x, b.y, b.w, b.h)))
    res = sorted(res, key=lambda x: -x[1])
    free_image(im)
    free_detections(dets, num)

    return res
#結果の可視化用関数
def check_detected_result_image(np_img,yolo_res):
    result_img = np_img
    for j in range(len(yolo_res)):
        left_top_x = int(yolo_res[j][2][0] - yolo_res[j][2][2] / 2)
        left_top_y = int(yolo_res[j][2][1] - yolo_res[j][2][3] / 2)
        right_top_x = int(yolo_res[j][2][0] + yolo_res[j][2][2] / 2)
        right_top_y = int(yolo_res[j][2][1] + yolo_res[j][2][3] / 2)
        result_img = cv2.rectangle(result_img, (left_top_x, left_top_y), (right_top_x, right_top_y),(255, 255, 255), 3)
        if len(yolo_res) > 0:
            font = cv2.FONT_HERSHEY_PLAIN
            cv2.putText(result_img, yolo_res[j][0],(max(int(yolo_res[j][2][0]) - 20, 0), int(yolo_res[j][2][1])), font, 3,(255, 255, 0), 1, cv2.LINE_AA)
            cv2.putText(result_img, str("{:.2}".format(yolo_res[j][1])),(max(int(yolo_res[j][2][0]) - 20, 0), int(yolo_res[j][2][1] + 40)), font, 3,(255, 0, 255), 1, cv2.LINE_AA)
    return result_img
上記スクリプトによりdetect_npを呼び出してopencvで読み込んだ画像(ndarray形式)に対する物体検出を行いcheck_detected_result_imageで検出結果の位置とラベルを可視化することができる。
3. Webカメラ画像の物体検出/ROS Topicの出力
次に、上記を利用してWebカメラ画像からYoloV3で物体検出を行い障害物の有無をTrue/FalseでROSトピックとして出力する方法を検討する。 誤検出を減らすために、障害物が画面の比率に対してラベルを"person"のみとし、画面比率で10%の大きさで連続3フレーム以上検出で障害物と判定し連続5フレーム以上検出で障害物フラグを落とすようにする。 ライブラリ・モデルのパスはubuntuのフォルダ構成に合わせて修正する。darknetをインストールしたパスをbashrcのLD_LIBRARY_PATHに追加しておくと良い。
#!/usr/bin/env python
# -*- coding: utf-8 -*-
import cv2
import rospy
from std_msgs.msg import Bool
import numpy as np
from darknet import detect_np,load_net,load_meta,check_detected_result_image

###########################
# Webcam_Object_detection #
###########################
class Webcam_Object_detection():

    ##################
    # Initialization #
    ##################
    def __init__(self):

        rospy.init_node('Webcam_Object_detection', anonymous=True)
        r = rospy.Rate(50)  # 50hz

        #initialize webcam
        self.cap = cv2.VideoCapture(0)

        #load yolo_v3 parameters
        self.net = load_net("/home/xxxx/darknet/cfg/yolov3-tiny.cfg", "/home/xxxx/darknet/cfg/yolov3-tiny.weights", 0)
        self.meta = load_meta("/home/xxxx/darknet/cfg/coco.data")

        self.obstacle_label = ["person"]
        self.obstacle_ratio = 0.1
        self.obstacle_frame_th = 3
        self.obstacle_cancel_frame_th = 5
        ret, frame = self.cap.read()
        self.imsize = frame.shape[0]*frame.shape[1]
        self.obstacle_cnt = 0
        self.obstacle_flg = False

        #initialize publisher
        self.object_detect_publisher = rospy.Publisher("/object_detection", Bool, queue_size=50)

    def detect_object(self,event):
        ret, frame = self.cap.read()

        k = cv2.waitKey(1)
        r = detect_np(self.net, self.meta, frame)
        result_im = check_detected_result_image(frame, r)
        cv2.imshow('Image', result_im )
        cv2.waitKey(1)

        #check obstacle
        flg = False
        for indx in range(len(r)):  #Check detected objects
            for indx2 in range(len(self.obstacle_label)):   #check label name
                #Check Object Label
                if r[indx][0] == self.obstacle_label[indx2]:
                    ratio = r[indx][2][2]*r[indx][2][3]/self.imsize
                    if ratio > self.obstacle_ratio: #check object size (ratio per frame size)
                        flg = True
                        break
            if flg == True:
                break
        if flg == True:
            self.obstacle_cnt = min(self.obstacle_cnt + 1,self.obstacle_cancel_frame_th)
        else:
            self.obstacle_cnt = max(self.obstacle_cnt - 1, 0)

        if self.obstacle_cnt > self.obstacle_frame_th:
            self.obstacle_flg = True
        elif self.obstacle_cnt <= 0:
            self.obstacle_flg = False

        self.object_detect_publisher.publish(self.obstacle_flg)

if __name__ == "__main__":

    test = Webcam_Object_detection()
    rospy.Timer(rospy.Duration(0.1), test.detect_object)
    rospy.spin()
動作結果は下記のようになる。

ROS 移動ロボットの経路追従制御(Pure Pursuit)
この記事の目的
ROSで移動ロボットの経路追従制御を実装する
1. move_baseにおけるロボットの移動経路追従
前回の投稿でROSシミュレーション上に走行経路を設定したので、今回は経路に追従するように車両の駆動・操舵量を計算するアルゴリズムについて検討する。
ROSのmove_baseではLocal_plannerを用いて算出した経路に対してロボットが経路を追従するための車速と角速度をcmd_velというTopicで発行する。
cmd_velはあくまで車体全体の速度・角速度であり、実際のロボットのアクチュエータの制御量(アクセル/ステアリング操作量)は別途ロボットの適正に応じて計算する必要がある。
今回は最も単純な経路追従アルゴリズムの1つであるPure Pursuitを実装する。
2. Pure Pursuitによる移動ロボットの経路追従
Pure Puruitは移動ロボット用の経路追従制御であり、自動運転のステアリング制御でも用いられる。
PurePursuitはロボットが経路を追従する際に、前方に目標とする点前方注視点(Lookahed Point)を設定して自車の進行方向がLookahed距離に向かうように車両の操舵量を決める制御である。 前方注視点までの距離をどのように決めるかによってステアリング時の安定性に大きく影響する。
3. Pure Pursuitの実装
今回は車両角速度までをPurePusuitによって決めるスクリプトを実装する。 経路追従時の車速は固定として、ユーザーがパラメータで与えるものとしている。
処理の大まかな流れとしては、
1.自車位置と経路の各点の距離を計算して自車と最も近い点を選択する
2.自車の近い点からLookAhedDistance遠い点を目標点として設定する (LookAhedDistanceは任意パラメータ)
3.目標点と自車位置の相対的な角度をarctanを用いて求める
4.自車の向きを考慮して操舵の方向を決め、車速と角度変化量を用いて角速度を算出する。
上記を車両が経路終端に到達するまで繰り返す。
#!/usr/bin/env python
# -*- coding: utf-8 -*-

import pandas as pd
import numpy as np
import math
# import for ros function
import rospy
import tf
from geometry_msgs.msg import PoseStamped, Twist
from std_msgs.msg import Header
from visualization_msgs.msg import Marker
from nav_msgs.msg import Path, Odometry

#######################################
# Simple Path follower (Pure Pursuit) #
#######################################
class Simple_path_follower():

    ##################
    # Initialization #
    ##################
    def __init__(self):

        rospy.init_node('Simple_Path_Follower', anonymous=True)
        self.r = rospy.Rate(50)  # 50hz

        self.target_speed = 1.0             #target speed [km/h]
        self.target_LookahedDist = 0.5      #Lookahed distance for Pure Pursuit[m]

        #first flg (for subscribe global path topic)
        self.path_first_flg = False
        self.odom_first_flg = False
        self.position_search_flg = False
        self.last_indx = 0

        #initialize publisher
        self.cmdvel_pub = rospy.Publisher("/cmd_vel", Twist, queue_size=50)
        self.lookahed_pub = rospy.Publisher("/lookahed_marker", Marker, queue_size=50)

        #initialize subscriber
        self.path_sub = rospy.Subscriber("/path", Path, self.cb_get_path_topic_subscriber)
        self.odom_sub = rospy.Subscriber("/odom", Odometry, self.cb_get_odometry_subscriber)


    def publish_lookahed_marker(self,x,y,yaw_euler):

        marker_data = Marker()
        marker_data.header.frame_id = "map"
        marker_data.header.stamp = rospy.Time.now()

        marker_data.ns = "my_name_space"
        marker_data.id = 0

        marker_data.action = Marker.ADD

        marker_data.pose.position.x = x
        marker_data.pose.position.y = y
        marker_data.pose.position.z = 0.0

        temp_quaternion = tf.transformations.quaternion_from_euler(0,0,yaw_euler)

        marker_data.pose.orientation.x = temp_quaternion[0]
        marker_data.pose.orientation.y = temp_quaternion[1]
        marker_data.pose.orientation.z = temp_quaternion[2]
        marker_data.pose.orientation.w = temp_quaternion[3]

        marker_data.color.r = 1.0
        marker_data.color.g = 0.0
        marker_data.color.b = 0.0
        marker_data.color.a = 1.0

        marker_data.scale.x = 0.1
        marker_data.scale.y = 0.1
        marker_data.scale.z = 0.1

        marker_data.lifetime = rospy.Duration()
        marker_data.type = 0

        self.lookahed_pub.publish(marker_data)


    ###################
    # Update cmd_vel  #
    ###################
    def update_cmd_vel(self):
        if self.path_first_flg == True and self.odom_first_flg == True:

            dist_from_current_pos_np = np.sqrt(np.power((self.path_x_np-self.current_x),2) + np.power((self.path_y_np-self.current_y),2))
            min_indx = dist_from_current_pos_np.argmin()
            nearest_x = self.path_x_np[min_indx]
            nearest_y = self.path_y_np[min_indx]
            # Get nearest Path point at first time
            if self.position_search_flg == False:
                self.pass_flg_np[0:min_indx] = 1    #Set pass flg
                self.position_search_flg = True
            else:
                # Check pass flg from vehicle position
                for indx in range (self.last_indx,self.path_x_np.shape[0]):
                    if dist_from_current_pos_np[indx] < 1.0:
                        self.pass_flg_np[indx] = 1
                    else:
                        break
            self.last_indx = min_indx

            #check goal
            if self.pass_flg_np[self.path_x_np.shape[0]-1] == 1:
                cmd_vel = Twist()
                self.cmdvel_pub.publish(cmd_vel)
                print("goal!!")
                return
            #calculate target point
            dist_sp_from_nearest = 0.0
            target_lookahed_x = nearest_x
            target_lookahed_y = nearest_y
            for indx in range (self.last_indx,self.path_x_np.shape[0]):
                dist_sp_from_nearest = self.path_st_np[indx] - self.path_st_np[self.last_indx]
                if (dist_sp_from_nearest) > self.target_LookahedDist:
                    target_lookahed_x = self.path_x_np[indx]
                    target_lookahed_y = self.path_y_np[indx]
                    break

            #calculate target yaw rate
            target_yaw = math.atan2(target_lookahed_y-self.current_y,target_lookahed_x-self.current_x)

            #check vehicle orientation
            # if target_yaw - self.target_yaw_last < -math.pi:
            #     target_yaw = 2*math.pi + target_yaw
            # elif target_yaw - self.target_yaw_last > math.pi:
            #     target_yaw = 2*math.pi - target_yaw

            yaw_diff = target_yaw - self.current_yaw_euler

            if yaw_diff > math.pi:
                yaw_diff = yaw_diff % math.pi
            elif yaw_diff < -math.pi:
                yaw_diff = yaw_diff%(-math.pi)


            sample_sec = dist_sp_from_nearest/(self.target_speed/3.6)
            if sample_sec != 0.0:
                yaw_rate = math.fabs(yaw_diff)/sample_sec
            else:
                yaw_rate = 0.0

            # check vehicle orientation and target yaw
            if math.fabs(target_yaw - self.current_yaw_euler) < math.pi:
                if (target_yaw) < (self.current_yaw_euler):
                    yaw_rate = yaw_rate * (-1.0)
            elif math.fabs(target_yaw - self.current_yaw_euler) > math.pi:
                if (target_yaw) > (self.current_yaw_euler):
                    yaw_rate = yaw_rate * (-1.0)

            print(yaw_diff*180/math.pi,target_yaw*180/math.pi,self.current_yaw_euler*180/math.pi)

            #Set Cmdvel
            cmd_vel = Twist()
            cmd_vel.linear.x = self.target_speed/3.6    #[m/s]
            cmd_vel.linear.y = 0.0
            cmd_vel.linear.z = 0.0
            cmd_vel.angular.x = 0.0
            cmd_vel.angular.y = 0.0
            cmd_vel.angular.z = yaw_rate
            self.cmdvel_pub.publish(cmd_vel)

            #publish maker
            self.publish_lookahed_marker(target_lookahed_x,target_lookahed_y,target_yaw)
            #print("cmd_vel_update")
            self.r.sleep()
            return


    ####################################
    # Callback for receiving Odometry  #
    ####################################
    def cb_get_odometry_subscriber(self,msg):
        self.current_x = msg.pose.pose.position.x
        self.current_y = msg.pose.pose.position.y
        e = tf.transformations.euler_from_quaternion((msg.pose.pose.orientation.x, msg.pose.pose.orientation.y, msg.pose.pose.orientation.z, msg.pose.pose.orientation.w))
        yaw_euler = e[2]
        self.current_yaw_euler = yaw_euler
        self.odom_first_flg = True
        #print("odom_sub")

    ######################################
    # Callback for receiving path topic  #
    ######################################
    def cb_get_path_topic_subscriber(self,msg):
        if self.path_first_flg != True:
            self.path_x_np = np.zeros([len(msg.poses)])
            self.path_y_np = np.zeros([len(msg.poses)])
            self.path_st_np = np.zeros([len(msg.poses)])
            self.pass_flg_np = np.zeros([len(msg.poses)])
            last_x = 0.0
            last_y = 0.0
            last_st = 0.0
            for indx in range(len(msg.poses)):
                self.path_x_np[indx] = msg.poses[indx].pose.position.x
                self.path_y_np[indx] = msg.poses[indx].pose.position.y
                self.path_st_np[indx] = last_st + math.sqrt((self.path_x_np[indx]-last_x)**2 + (self.path_y_np[indx]-last_y)**2)
                last_x = self.path_x_np[indx]
                last_y = self.path_y_np[indx]
                last_st = self.path_st_np[indx]
            self.path_first_flg = True
            #print("path(first)")

if __name__ == '__main__':
    print('Path following is Started...')
    test = Simple_path_follower()
    try:
        while not rospy.is_shutdown():
            test.update_cmd_vel()
    except KeyboardInterrupt:
        print("finished!")
上記スクリプトでは、目標点を可視化するためmakerを用いて前方注視点を可視化している また、以前に作成した車両シミュレーション処理をcmd_velを受信して車速・角速度を変更できるように下記のように書き換える。
#中略

    #####################
    # cmdvel subscriber #
    #####################
    def cb_get_cmdvel_subscriber(self, msg):
        self.cmdvel_linear_x =msg.linear.x
        self.cmdvel_linear_y =msg.linear.x
        self.cmdvel_angular_z =msg.angular.z
        pass
下記のように経路追従を行うことができる。
